Mega-guide to Nvidia CUDA, CUDA Toolkit, CUDA Driver for an Ubuntu 20.04 Nvidia GPU PC Build
Setting up an Nvidia GPU enabled system is the ante for deep learning research at home. Without a dedicated GPU, users are forced to either use Google Colab, which has great performance for a free service but is a notebook environment, or a cloud ML service that costs money (~$0.9 GPU/hour on AWS). After playing with those options for awhile, I decided to build my own system. In doing so, I learned how confusing the process can be, especially if it’s your first PC build or first build with a dedicated GPU system.
So before getting into this a note of praise - you aren’t dumb if you don’t fully understand CUDA drivers. I’m a deep learning practitioner with software experience, and this was painful for me.
First some terminology:
- Nvidia X.Y Toolkit: what tutorials mean when they say “install CUDA X.Y”. The core versions of CUDA are 10.xx (past) and 11.yy (future)
- Nvidia Driver: the driver controlling defining GPU’s interface with your OS / Architecture.
nvcc: the CUDA compiler driver
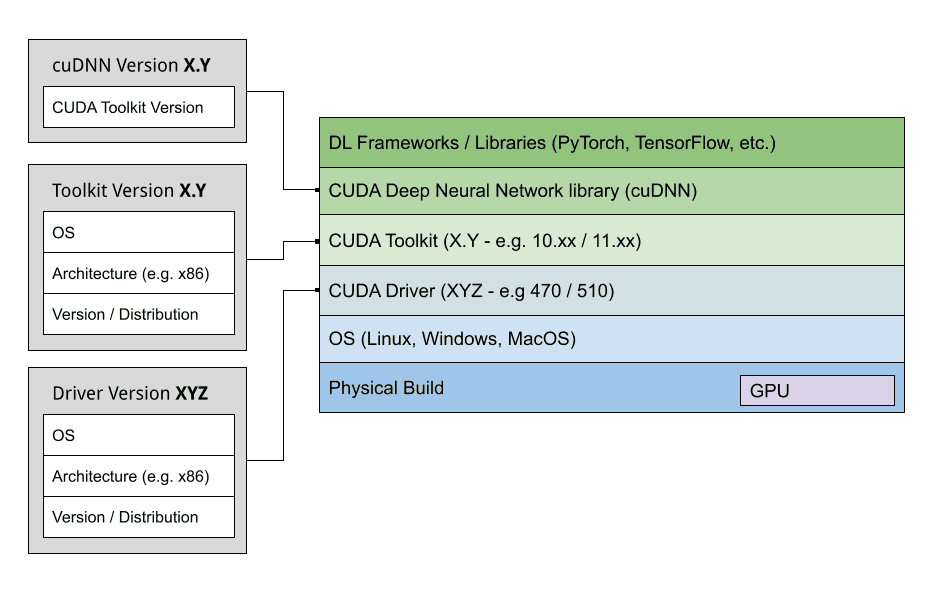
Nvidia Software Ecosystem at-a-glance.

Toolkit documentation:
Release Notes :: CUDA Toolkit Documentation
Also useful is the driver documentation. You can find it for your specific driver version at:
NVIDIA Accelerated Linux Graphics Driver README and Installation Guide
The Decision: picking your CUDA installation
If you read the release notes above, you’ll observe multiple installation methods for the CUDA driver / toolkit pair on linux. It can be deeply confusing. Do I go with the runfile or Debian installer? Should I just go with the newest versions of the CUDA toolkit and CUDA driver?
Nvidia makes it clear that there is no correct answer here. While there are some constraints (described below), just do whatever is right for your system.
CUDA Compatibility
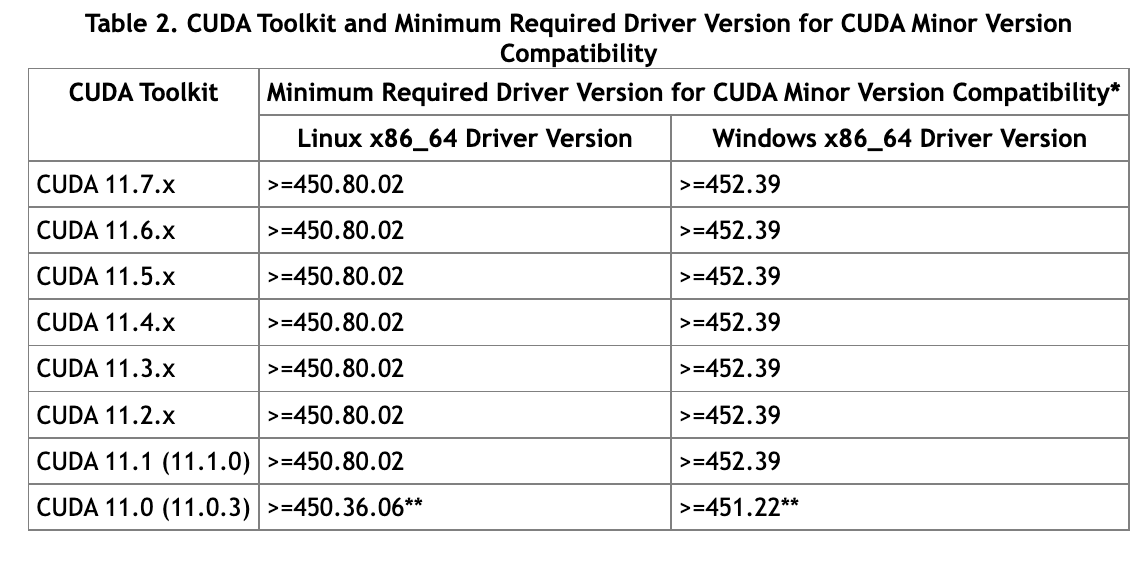
Not every version of CUDA driver supports every version of the CUDA Toolkit. Before making a choice, refer to CUDA compatibility matrix, copied here for reference.

But wait! This is not the actual table you should refer to - this table just says that for CUDA Toolkit 11.x minor version compatibility (i.e. to even be able to support minor version “x”), you need at least driver ≥450.80.02. The actual table we will refer to is below.

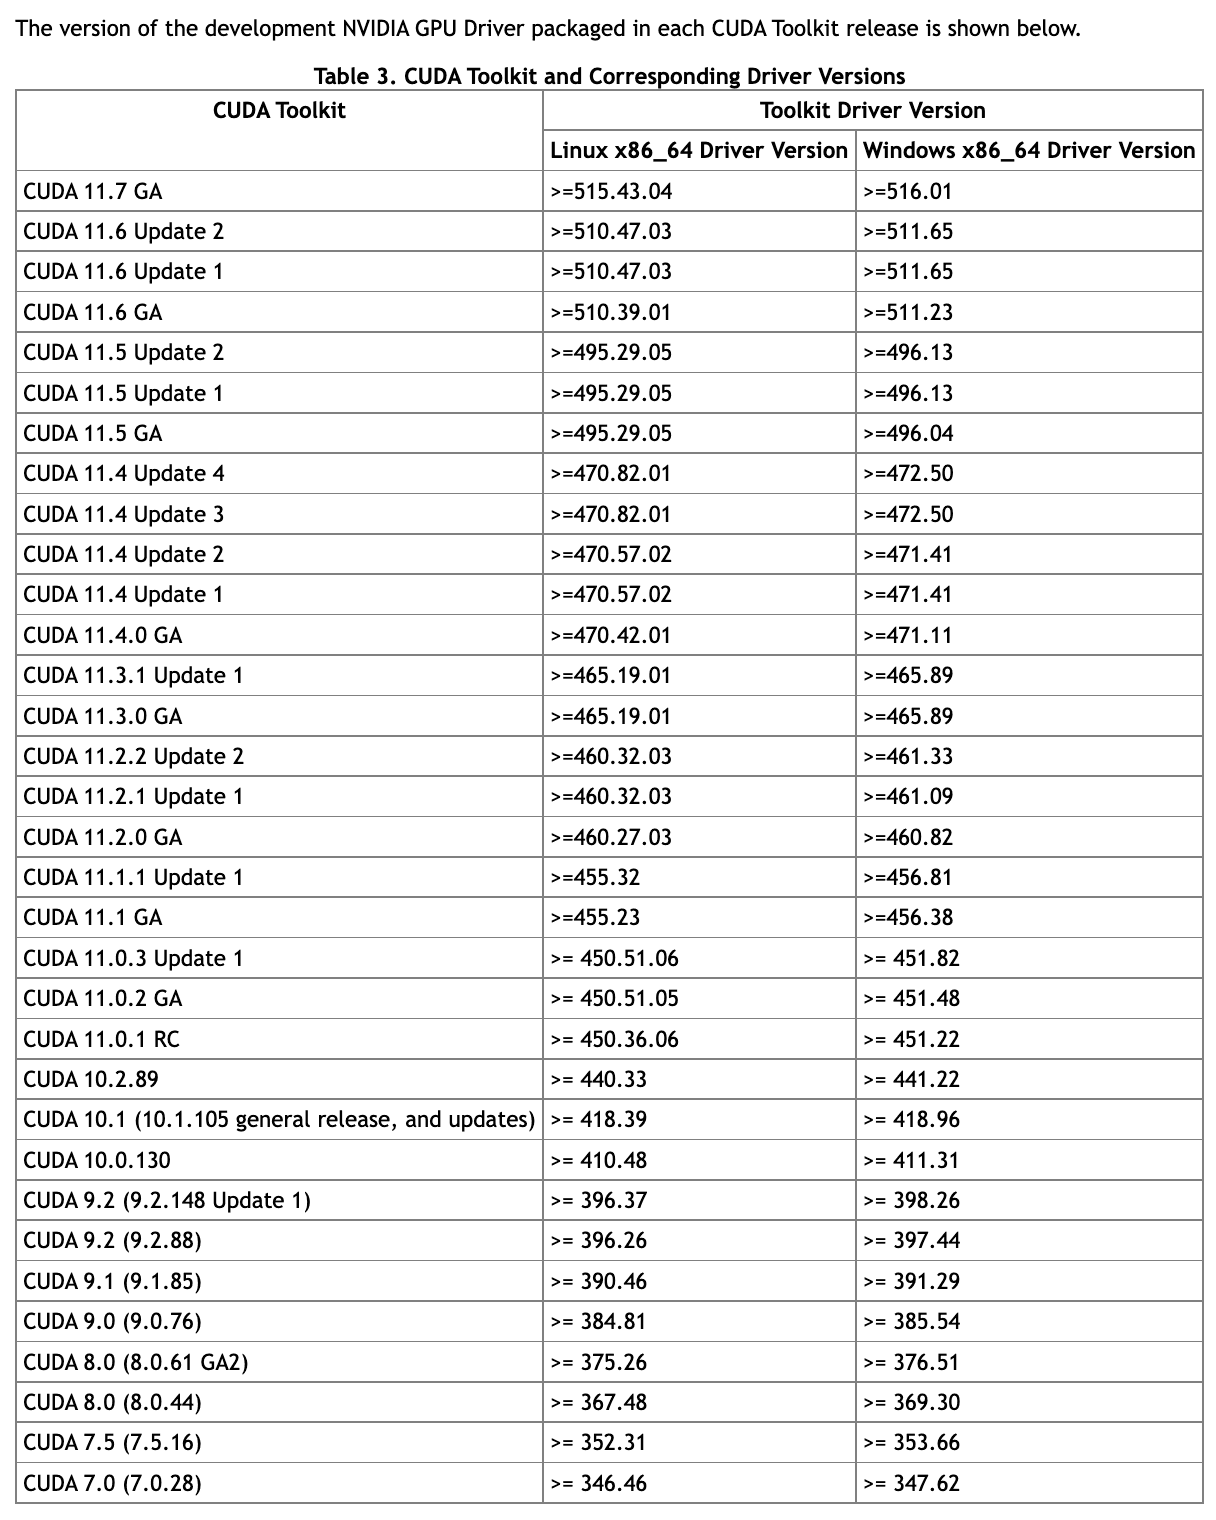
This is the reference table we care about - it shows the minimum driver required for Linux 64 bit x86 architecture to support a given CUDA Toolkit version. Let’s say we decide on 11.2.0 GA for the global installation of CUDA Toolkit on our system. We will need at least CUDA driver 460.27.03 on our system. That’s it, we’ve solved it 🤝. We’re free to use a higher version of the CUDA driver, since CUDA drivers are always designed to be backwards compatible, but sticking with a lower (stable) version of driver is fine too.
Special Case: Forward Compatibility
Let’s quickly discuss a special use-case. The vast majority of users will go with a stable pair of CUDA toolkit and CUDA driver, but what about the case where we’re fixed to an old driver but want to use a newer version of CUDA.
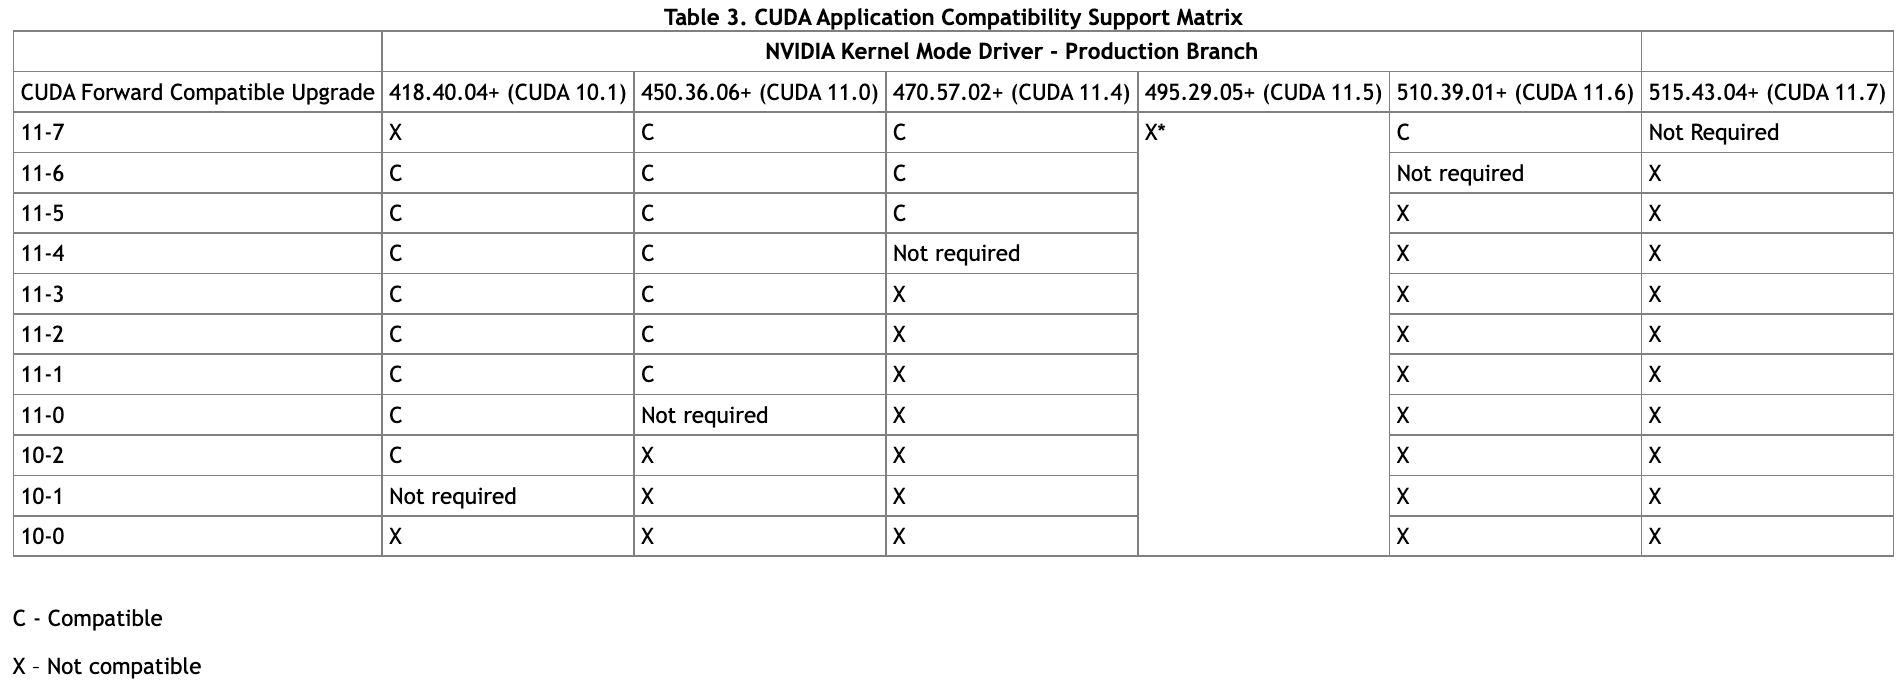
As an example, let’s say we are fixed to CUDA 418.40.04, but need our system to use CUDA 11.2. The compatibility table says we are out of luck, since the minimum required version is 460.27.03 😩. Forward compatibility packages to the rescue! Referring to the table below, we see forward compability for the 418.40.04 driver is available for CUDA 10.2-11.6 🎉.

All we have to do is install the forward compatiblity package onto our system. On Ubuntu, prefer installing the compatibility package from network repositories. In highly specific use cases, can install the compatibility package manually from a runfile (.run) - but for most users just use apt-get to install.
sudo apt-get install -y cuda-compat-11-2
The package will install to /usr/local/cuda/compat . Now include the installed CUDA compability files. This code below also runs the CUDA Device Query utility which “enumerates the properties of the CUDA devices present in the system”.****
LD_LIBRARY_PATH=/usr/local/cuda/compat:$LD_LIBRARY_PATH samples/bin/x86_64/linux/release/deviceQuery
The Installation
Quoting from the Nvidia docs:
When installing CUDA on Ubuntu, you can choose between the Runfile Installer and the Debian Installer. The Runfile Installer is only available as a Local Installer. The Debian Installer is available as both a Local Installer and a Network Installer. The Network Installer allows you to download only the files you need. The Local Installer is a stand-alone installer with a large initial download. In the case of the Debian installers, the instructions for the Local and Network variants are the same.
As a heuristic, if you don’t know why you would choose one installation method over the other, choose the Debian Installer!
I’m not going to copy steps from the docs, but to summarize:
- Go through pre-installation actions
- If going through a “local” installation (.deb or .runfile install), instead of network installation (.deb install only), download the installer to your system from the downloads page for the specific CUDA toolkit you want to install
- Go through installation action
- Go through post-installation actions
Hard Reset: clearing your system of installed CUDA packages
“Removing CUDA” is a popular topic online. Now that we understand CUDA is actually a collection of packages (Toolkit, Driver, forward-compat, etc.) we have a better idea of what it takes to uninstall CUDA. First, from the Nvidia Docs we can uninstall a CUDA deb installation on Ubuntu using:
sudo apt-get --purge remove cuda*
Remember that using deb installs files to /usr/local, so after this command ls /usr/local/ | grep cuda should show no matched files.
If we installed using a runfile instead of the deb installer, we need to uninstall the Driver and Toolkit with separate commands:
sudo /usr/local/cuda-X.Y/bin/cuda-uninstaller # Uninstall the Toolkit
sudo /usr/bin/nvidia-uninstall # Uninstall the Driver
Anaconda: the easiest way to manage CUDA versions across projects
The easiest way to manage CUDA for different DL projects is manage your environments with Anaconda.
Some highlights:
- Anaconda can manage multiple CUDA toolkit versions separately from your system’s base CUDA toolkit version
- Anaconda takes care of the overhead of installation and un-installation.
- Uninstall is as easy as
conda remove cuda
Attempt #1
I had almost no idea what I was doing for this attempt. My only requirement was CUDA 11.7 because I wanted to run Jax from the base CUDA system install and Jax requires 11.7. Given this tutorial, I now know this is not smart. You can install a system-wide version of Toolkit + Driver that is stable to the system hardware (i.e. support suspend-to-RAM) and use conda to manage a higher CUDA version that supports Jax. Installed CUDA driver 515 and CUDA toolkit 11.7 via the Runfile installation method. deviceQuery sample returns expected output and nvidia-smi command also shows expected output. However, I consider this installation attempt a failure. Most important feature for my system is suspend-to-RAM - i.e. the ability to take GPU state at a given time, move it to RAM, and put the system into “suspend” mode without fully turning off the power. This is the most important feature to modern computer usage - i.e. shutting your laptop lid, opening back up and having all the applications you had open... still open. Having to do a full power cycle after every computer use significantly hampers usability 🤦🏼♂️. I’ll have to purge everything and try again.
Attempt #2 (ongoing)
Pre-notes: I’m going to try purging all CUDA from the entire system first. I’ve set in the BIOS that the system uses integrated graphics on the mobo, not the GPU, for graphics, so the system will boot fine without the GPU drivers installed. I have a feeling using the newest Nvidia driver (515) is the problem - going to try reverting to 470 since it comes with the Debian installer and is the base version installed on Ubuntu by default. I’m also hoping using the Debian installer fixes the “suspend-to-RAM” issue. If you read the release notes for the drivers (470 vs. 515) they handle power management differently 🤔. I’m sure 515 has more features + efficiency, but I want things to work.
Summary
Installing CUDA on your system is non-trivial. In general, the Nvidia docs are thorough and do contain all of the information you might need, but feel inscrutable to a first-time user. It would probably be helpful for Nvidia to put together more quick installation guides for common configurations. This guide is by no means complete (or even correct)! If I’m missing anything, please let me know.